


Central Office Address:
No.104,Andarzgoo Blvd,Qeytarieh Area,Tehran,Iran

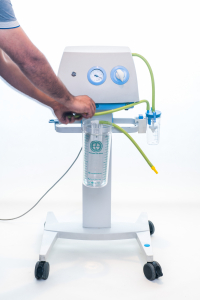
To install on a portable device, the type and model of the device should be considered. Most of the devices used in medical centers in Iran are MEDELA and SAIRAN, which enjoy a profile under the motor part of the devices. Abadis Med. has designed a type of portable bracket for installing suction canisters, which is installed on the profile of these types of devices. Here, the installation of this product is explained step by step.

The portable bracket consists of two parts that are attached to each other by two M4 size screws.

The profile of the portable device is placed between these two parts and the bracket is fixed on the profile of the portable device all through tightening the screws.
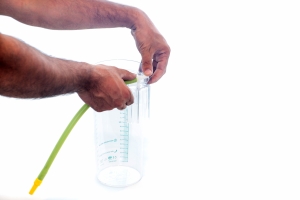
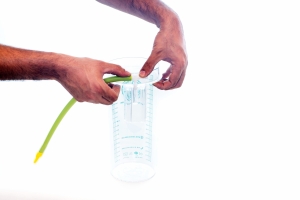
In this step, connect the T-connector and the connection on the 2 and 3 liter canisters.
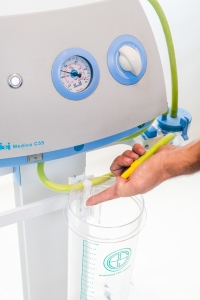
In this step, we measure the distance from the output of the portable device to the T-connector in canisters 2 and 3 and the vacuum connector in canisters 1. Then we cut the silicone vacuum tubing size 7*13 and connect one side of the vacuum tubing to the outlet of the portable suction device and the other side to the T-connector in canisters 2 and 3 and the vacuum connector in canisters 1.
To test the absence of leakage of the output vacuum, we use the portable suction device to measure the maximum curve pressure. To perform this test, we first close the vacuum path of the canister (the hole inside the canister and the vacuum connector). In this case, if the portable suction device is filled with the maximum vacuum pressure, there should be no leakage in the installed connections.

First, put the wall bracket on the metal console in the right place. This action allows you to have enough room to change the bags while you mount the canister on the bracket.

After finding the right place for the wall bracket, mark the holes inside the brackets with a marker. Use a 15mm drill bit to drill holes in the metal console, which is often made of aluminum. With this action, if the copper fluid pipes behind the console are passed from an inappropriate place, the possibility of perforation and leakage will be eliminated.
After installing the bracket, if you plan to install a 2- and 3-liter canister, then mount the T-connector and the connection on the canister.

Next, slide the canisters onto the bracket from the top.
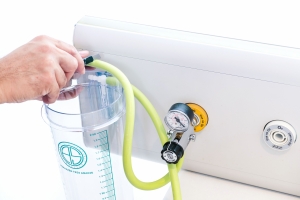
After installation, measure the distance from the vacuum outlet (usually from the regulator) to the suction canister. Now, cut the silicone vacuum tubing size 7*13 and connect it from one side to the vacuum outlet and the other side of the vacuum tubing to the T-connector (if installing a 2 and 3 liter canister) or connect it to the Abadis vacuum connection (if installing a 1 liter canister).

First, determine the approximate location of the trolley base in the surgery room. Then, measure from the vacuum outlet to the base of the trolley and cut the 7×13 silicone vacuum tubing based on that.

Install the two parts of the vacuum tubing, one to the vacuum outlet and the other to the regulator or valve inlet, on the trolley base.
On the 2 and 3 liter canisters, connect the T-connector and the connection. Then, measure the distance from the regulator outlet to the T-connector in the 2 and 3 liter canisters and the vacuum connection in 1 liter canisters.
Cut the silicone vacuum tubing size 7*13. Connect one side of the vacuum tubing to the outlet of the regulator or valve and the other side to the T-connector in the 2 and 3 liter canisters and the vacuum connection in 1 liter canisters.
To test the absence of leakage in the vacuum, close the output of the vacuum regulator to measure the maximum amount of negative pressure. Then, by closing the canister vacuum path (the hole inside the canister and the vacuum connection), bring the pressure to the maximum level in the vacuum regulator. In this case, there should not be any leakage in the installed connections.
